# Life-Cycle
# Overview
An ezFlap widget is also a Flutter widget, and it goes through the same life-cycle phases as all stateful Flutter widgets.
ezFlap widgets have an additional life cycle on top of the native Flutter life-cycle.
ezFlap widgets also have their own high-level hook methods that can be overridden to perform various actions in key points during the ezFlap widget's life cycle transitions:
- hookInitState - initialize state necessary for the initial render of the ezFlap widget.
- hookPrepare - asynchronously initialize state necessary for future rendering of the widget.
- hookReady - any additional actions to be taken after the widget is initialized and rendered.
An ezFlap widget goes through the following ezFlap life-cycle states:
- Created - the initial state when the widget is instantiated.
- Mounted - set at the start of the native
initState()function. - Initialized - set after
hookInitState()is called (also in the nativeinitState()function). - Ready - set when
hookPrepare()returns. - Disposing - set at the start of the native
dispose()function. - Disposed - set at the end of the native
dispose()function.
# Initialization
ezFlap widgets are initialized in two steps:
- Synchronously, before the first build.
- Asynchronously, after the first build.
ezFlap provides two hook functions to write synchronous and asynchronous initialization code in:
void hookInitState()Future<void> hookPrepare() async
They are covered in detail below.
# Disposal
ezFlap widgets are disposed when the native dispose() method is called (by Flutter).
Like any other native Flutter widget, ezFlap widgets need to perform cleanups and release any resources that don't get released automatically by Flutter when a widget is disposed.
The recommended way to do these cleanups with ezFlap is by registering disposal callbacks, using the onDispose method
provided by ezFlap.
# Example
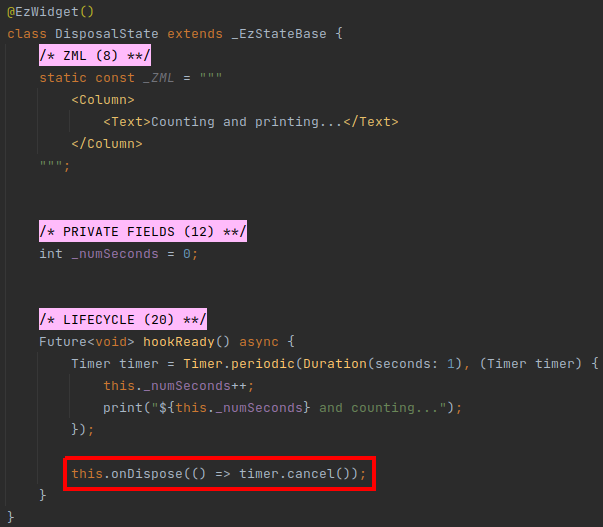
In the above example, Timer.periodic is used to increase a counter and print it to the console every second.
The Timer needs to be stopped when the widget is disposed. Otherwise, it will keep running in the background indefinitely.
In the above example, the onDispose() ezFlap utility method is called to register a callback that would be called
automatically, by ezFlap, when the widget is disposed, and will cancel the Timer.
# Disposal Steps
When an ezFlap widget is disposed, ezFlap performs the following actions:
- Set life-cycle state to Disposing.
- Clear
@EzRefand@EzRefsparent widget references to the disposing widget (more details in Refs). - Call
hookDispose()(see below). - Invoke disposal callbacks (that were previously registered with
onDispose()).- In reverse order: the callback that was registered first will be called last.
- Set life-cycle state to Disposed.
# Hooks
ezFlap exposes several hooks that allow ezFlap widgets to invoke custom code at key points during the life cycle.
To use a hook - override it.
NO NEED TO CALL SUPER HOOKS
The hook functions are for application use.
It is not necessary to call the parent version of the hook.
For example, in the following example, calling super.hookInitState() is not necessary:
void hookInitState() {
super.hookInitState(); // <-- not necessary!
// stuff...
}
2
3
4
5
The following hooks are available:
# hookInitState
# Signature
void hookInitState()
# Schedule
Called synchronously from the native initState(), before the first widget build.
# Purpose
Initialize late bound fields and other data that will be accessed during the first build.
When hookInitState returns - the widget enters the Initialized life-cycle state, and shortly afterwards - the
widget is built for the first time.
# hookBuildInitialWidget
# Signature
Widget? hookBuildInitialWidget()
# Schedule
Called whenever the widget is built while in the Initialized state (i.e. before reaching the Ready state).
# Purpose
In some cases we need to perform asynchronous initializations before we can properly render our widget.
For example, we may need to get data from a storage device or an API.
ezFlap supports such cases by allowing to split the rendering of the widgets into two phases:
- Phase 1: after the synchronous initializations but before the asynchronous initializations.
- Phase 2: after the asynchronous initializations.
By default, the same builder is used for both phases (i.e. the content of the widget's _ZML is
rendered as defined as soon as hookInitState() is finished).
However, it is possible to override this behavior, and tell the ezFlap widget to build a different widgets tree, until the ezFlap widget is fully initialized.
There are two ways to do this:
- Using the
_INITIAL_ZMLconstant (i.e. in addition to_ZML; this is covered later in this chapter). - By returning the alternative top-level widget to render from
hookBuildInitialWidget().
The hookBuildInitialWidget hook can be used to return an alternative widget, which would then be
returned from the builder instead of the widget's regular ZML while the widget is initializing (i.e.
until hookPrepare() is finished).
This hook is called in every build, until the widget reaches the Ready state.
Once the widget reaches the Ready state - this hook is no longer called (and will never be called again for the widget).
If we want to instruct ezFlap to use the regular ZML, even while the widget is being initialized - we can return null from this hook (or simply not override it).
INITIAL ZML PRECEDENCE
If the hookBuildInitialWidget() hook returns a widget, then even if an _INITIAL_ZML constant is provided for the
widget - it is ignored, and the widget returned from this hook is used instead.
The _INITIAL_ZML constant is described later in this chapter.
# hookPrepare
# Signature
Future<void> hookPrepare() async
# Schedule
Called one tick after the native initState() returns.
It may get called before the first widget build (i.e. before the widget is rendered for the first time), or afterwards.
In other words - do not assume that the widget has already been built, and do not assume that it hasn't.
# Purpose
This hook is used to perform asynchronous initializations (e.g. such as calling a web service) that the regular widget's ZML depends on.
It is also ok to perform synchronous initializations in this hook, as long as they are not needed for the initial ZML.
When this hook returns (i.e. after its Future is resolved) - the widget is put into the Ready state.
If a specialized initial ZML was used - ezFlap will now switch to use the widget's regular ZML.
# hookReady
# Signature
Future<void> hookReady() async
# Schedule
Called after the widget is put in the Ready state (i.e. after hookPrepare() returns).
# Purpose
This hook is used to perform initializations that the ZML does not depend on.
This is the last initialization hook.
# hookDispose
# Signature
void hookDispose()
# Schedule
Called from the native onDispose() method, before calling the registered disposal callbacks (see below).
# Purpose
This hook provides a method to free up resources or do any kind of cleanup before the disposal callbacks are invoked.
USE DISPOSAL CALLBACKS
The recommended way to handle cleanups is by registering disposal callbacks, using onDispose().
The cleanup callbacks should be registered right after allocating the resource that needs to be cleaned up.
This approach helps to ensure that we don't forget to clean up, and keeping the initialization and cleanup code together makes the code more maintainable.
# Initial ZML
Initial ZML is a ZML snippet that is used instead of the regular widget ZML while the widget is initializing.
The initial ZML is used until the widget reaches the Ready life-cycle state.
An initialization-time widget can be provided by the hookBuildInitialWidget hook, but the recommended way is to
provide it in the form of ZML markup instead.
Initial ZML can be provided in two ways:
- By specifying the ZML in an
_INITIAL_ZMLconstant. - By passing the ZML to the
initialZmlparameter of the@EzWidgetannotation.
The two ways are mutually-exclusive.
# Example
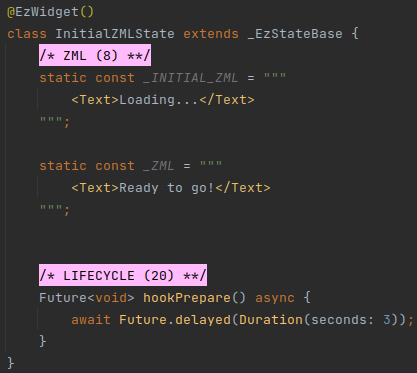
In the above example, the text "Loading..." will appear while the initial ZML is used.
The initial ZML will be used for three seconds (i.e. until hookPrepare() returns), after which the text "Ready to go!"
will appear.
← ZSS Transformers →